

Over time, the hydraulic oil may be mixed with dust particles, soil particles, or even metal particles, which could lead to damage and cause the performance of mini excavators to dwindle. That’s why one must replace the filters and the hydraulic oil regularly to ensure the hydraulic system is always in good shape and the operation is effective.
Right now I am with you, explaining the process of how to change the hydraulic oil and filter on the mini excavator. This way, I am guiding you and, at the same time, offering tips and the best way to do it.
Change Hydraulic Oil and Filters for What Reason?
Besides, maintaining your mini- excavators hydraulic system in an operational status is important for many reasons. Here are a few of them:
- saving from pollution Pure hydraulic oil that changes its color may create an extension in the system’s volume, impede the performance of the parts and as a result of that, need more energy.
- performing work fluently The greasing and the filtering of the oil ensure the smooth functioning of all the components like the arm, boom, and bucket.
- Keeping Equipment Running The scheduled maintenance of a vehicle, which incorporates the replacement of the hydraulic oil and filter, will be of help in the prolongation of the equipment’s life and eliminate repair billings as well.
When Should Hydraulic Oil and Filters Be Replaced?
In performing at its optimal capacity, one follows this maintenance schedule:
1. Hydraulic Oil: Change it after every 2500 hours of operation.
2. Hydraulic Oil Filter: The replacements should be completed per 1000 hours. If you work a lot with attachments like hydraulic breakers, make sure you decrease these intervals so the system flies the flag without hassle.
4- Tools and Materials Needed
First of all, ensure that these are the things you have in your possession:
- Anti-wear hydraulic oil (12L)
- Hydraulic oil filter (1 unit)
- 14mm wrench
- 12mm wrench
- 10mm wrench
- Oil suction pump
5-Step-by-Step Guide to Changing Hydraulic Oil and Filter
Step 1: Park and makeup
Secure Parking To begin with, it is absolutely necessary that the machine stay even with the ground surface. Make sure the arm cylinder is totally retracted, and then, extend the bucket cylinder out and lower the bucket down to the ground. Keep the engine idling for around five minutes. Next, to avoid oil overflow, shut down the engine.
Turn off the Engine Meanwhile, the travel lock should be turned on, and the joysticks will be brought to their neutral position while the engine is still running. Remove the key and leave it on the panel. Keep it idling while the oil is being filled. When the pump is intermittent, the oil temperature will decrease.
Step 2: Access the Hydraulic Tank
Eliminate a Cover The simple task of using a spanner to unbolt the top cap and placing it aside and then taking off the shield, which was covering the tank, will expose the place that holds the mentioned contents, like the reservoir of the oil and the filter.

To ensure that no dirt gets into the system upon turning it on, please clear the area and afterwards clean the hydraulic oil reservoir surface.
Step 3: Drain the Old Hydraulic Oil
- Release Pressure Carefully lift the hydraulic oil cap slowly to let the pressure out. This way, if there is any air in the system it will come out gradually. Mind the oil that is shooting out that can hurt you.
- Then, remove the drain plug from the tank base Then, take out the drain plug from the base of the tank to let the oil completely drain down.
Step 4: Replace the Hydraulic Oil Filter
- Take out the old Filter Loosen the oil-pickup filter cap by turning it counterclockwise and simply pull your old and used up hydraulic filter out of the tank.
- Scraping the tank and filter bottom Go Through The Tank and Filter thoroughly clean the filter and the interior of the hydraulic tank by scraping out and throwing away the stuck materials.
- Put the new filter on Install the fresh filter carefully to the outlet. The knobs must be in the correct position and the filter should be properly secured.
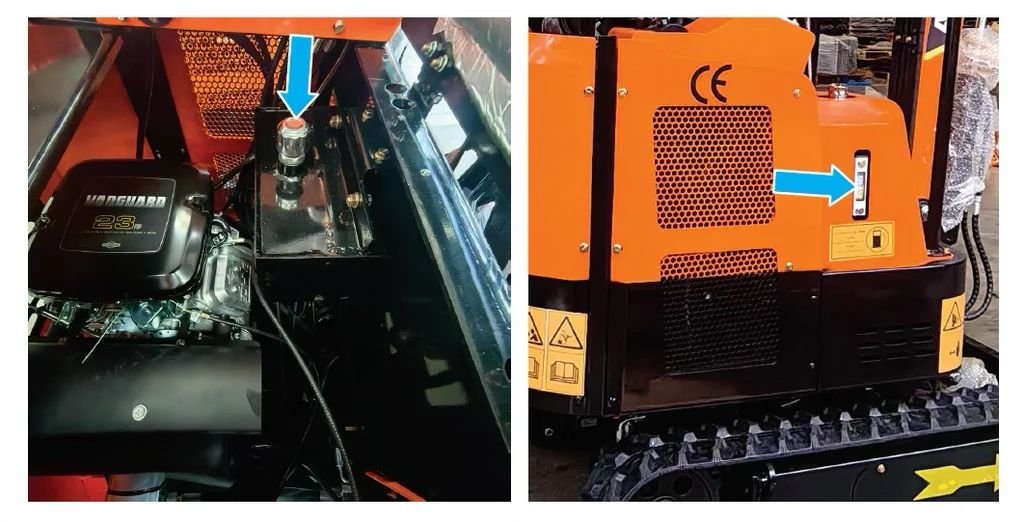
Step 5: Refill the Hydraulic Oil
- Use Unchanged or New Oil If the oil you used before has not reached its time for change you may pour it into the tank. If the tank needs complete replacement, please make sure to use new hydraulic oil.
- Fill the tank to the correct level Do this slowly and gently until the oil reached the 2/3 point on the dipstick. This is a fit level to be used by the machinery in order to be assured of proper operation.
- Make sure to replace the drain plug Clean and exchange the drain plug in the tank’s bottom, in order to avoid the possibility of leaks.
-
Step 6: Reassemble and Test
- Join all parts back into their position Completely install all panels and covers and fucking which they were not included in the process of removing.
- Turn on the Engine Start the Engine and leave it idle for about two minutes. Check all control points. Make sure the hydraulic system is without any leaks or problems.
Conclusion
To properly change the hydraulic oil and filters is a simple job that can be finished, using the suitable instruments and procedures. By frequently performing it as the routine maintenance will ensure your mini-excavator is always now running well and perfect and you save yourself the trouble and financial burden of the future repair. The whole thing will be clean, things will be safe, and your equipment will be in top condition.
